Locomotion System
My goal for the first month of learning Unreal Engine 5 was to create a basic locomotion system with an idle, a run, and a jump. Nothing to crazy, sure I could add a bunch of transitions and banks and idle breaks but I just wanted to get the basics down first. So after many early mornings of animating before work and A LOT of tutorials (Shout out Kevin Freeman for all his great tutorials on YouTube) I finally managed to have a working locomotion system. Obviously the animations could be better but like I said, I just wanted to get something working and perfection is the enemy of done.
Now I’ve messed around in Unreal before and done an idle and run but all of the animations were done in Maya and I pretty much just copied the blueprints from tutorials without actually knowing what was going on. For this, I actually wanted to absorb the information so I have an understanding of everything and am able to do it without help. This is where the Ask a Dev YouTube channel comes in. Kevin Freeman has a bunch of tutorials on everything in Unreal Engine and breaks everything down so well that it’s easy to understand. He has a great series on Animation Blueprints so I would watch each lesson in full while taking tons of notes and then I would re-watch and follow along in Unreal with my own animations.
I’ve been doing a lot of idles in Maya recently and I figured that was the best place to start since it’s the first thing you see in-game and I could get one done fairly quickly. After watching a few tutorials on the sequencer and the general layout of animating inside Unreal, I got to work on the idle and actually had a pretty good time figuring out how to do everything in Unreal and my Maya skills transferred over without too much trouble. I’d say the biggest difference that took me a bit to get used too was the fact that the axes are not the same. In Maya, Y is the vertical axis and in Unreal, Z is the vertical axis.
After I finished the Idle animation, I went to put hook it up in-game and kept running into this problem of the mesh not being lined up with capsule. You can see in the video above that the mesh is way far in front of the capsule and not where it’s supposed to be. This is took me a little bit longer to figure out than I’d like to admit but it was because I moved the global control so I could have a better view of the rig while animating since the 0,0,0 was in a wall. After figuring this out, it was a quick fix of just resetting the global control and baking the animation sequence again. Once I did that, the mesh lined up with the capsule perfectly and the Idle was looking good.
Woohoo! Idle done, time to move on to the run. So I created a new level sequence and got to animating a quick and dirty run. I found a good reference, turned on the Kingdom Hearts soundtrack and spent a good three hours on the run cycle before hooking it up in-game.
Now this looks pretty wonky so I got a bunch of great notes from a few awesome animators and went back to fix it.
Great! So I have a working idle and run so I’m two thirds of the way there and should be done in no time. WRONG! I knew the jump would be more complex than the other animations but it animating it specifically for in-game really tested me and forced me to learn a lot of different things. It’s been around two years since I’ve animated a jump so needless to say I was pretty rusty. I realized this when I tried to animate one from memory and it ended up looking terrible. So thanks to The Animator’s Survival Kit by Richard Williams, GAME ANIM by Jonathon Cooper, and a YouTube Tutorial from Tyler Gogan, I was all set to animate a jump that actually looked decent.
Now I knew that jump animations were cut up into different parts to accommodate different scenarios, but I had no idea where to cut it or how to set it up in the blueprint and state machine. Once again, Kevin Freeman’s video on this was a massive help. I ended up re-iterating the jump animations way more than the run or idle animations. By the end there were four iterations of the idle, four iterations of the run, and around fifteen iterations of the jump. Since I animated it in Unreal, it was a breeze fixing little things in the animation without having to re-export from Maya and re-import into Unreal. I ended up splitting the jump into a start, fall loop, and land, all being different states within the state machine. There were a lot of small issues I had to fix like the wind-up on the start being too long, the fall loop being too high off the ground, changing the landing to an additive animation, and a lot of general speed issues.
Speaking of state machines, that was another hurdle I had to overcome. Like everything else, I just had a basic knowledge of it. I knew that each animation was a different state, and there were rules to go from state to state, not much else. I had to learn a lot about variables, transitional rules, blend spaces, caches, and slots.

AnimGraph
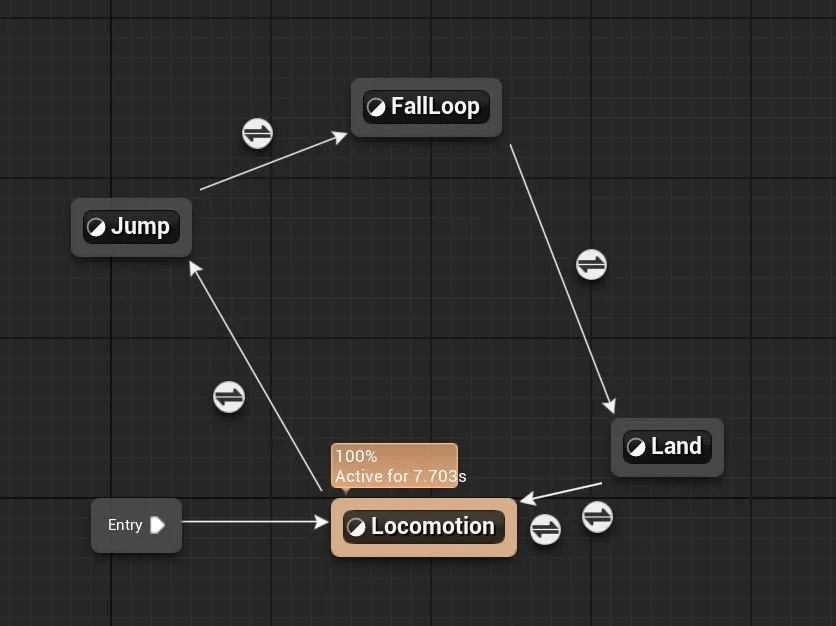
MainState State Machine
I’m sure if you’re somebody reading this that is working in the industry or if you have any knowledge of state machines, you know exactly what’s going on here. I have the idle to run in a separate state machine with a blend space that is saved in a cache and that is the locomotion state. This is so that the land, which is an additive animation, will play on top the of Locomotion, whether it is idle or running, for a seamless transition. I created a float variable called GroundSpeed that is the driver for my idle to run, so basically if the GroundSpeed is greater than 5, it can blend into the run from the idle. To go from Locomotion to Jump, I just have it so if Is Falling (not on the ground) is true, it can enter transition. From Jump, I have an Automatic Rule Based Transition so that after 0.3 seconds it will transition to the FallLoop and from that to Land I have it so that if Is Falling is false, it will transition. To go back to Locomotion, I have another Automatic Rule Based Transition and a ShouldMove Boolean to help with the transition to a run. I’m starting to really enjoy learning about the technical stuff so this part was pretty fun.
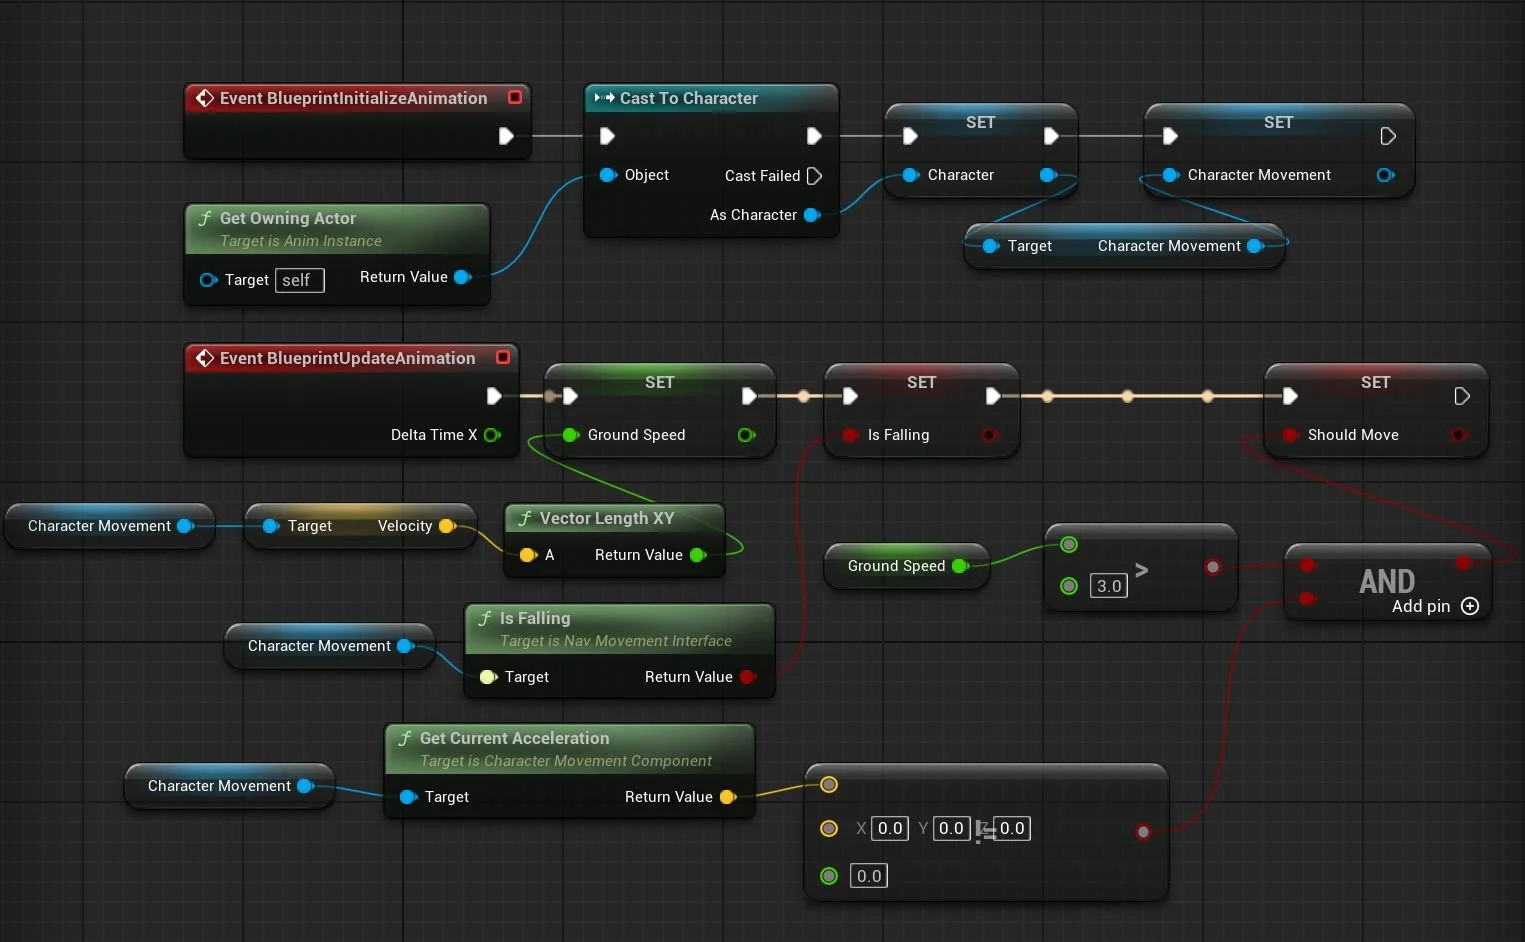
Event Graph
Overall, I had a great time learning all this stuff and can’t wait to do more with Unreal Engine. It was definitely an adjustment coming from Maya but I don’t see myself going back anytime soon. Unreal just makes everything so streamlined so that fixing and re-iterating on things is a much smoother process than animating in Maya. I’m going to try to expand on this and learn a lot more before doing it again with a different character and some more stylized animations. Thanks for reading!